
That’s “Vehicular Illuminated Panel” folks. Just remember, in a few years’ time when everyone is doing it, you saw it here first…
Local readers may have clocked me pottering around Warwickshire in my orange ex-RAC van since I bought it in 2013, and while the garish colour guarantees a high profile presence, when I was first looking at getting it liveried back then I wondered if there was a way to illuminate the logo on the sides.
In the end I decided it was too much like hard work, so I engaged the services of Signs Express in Warwick to perform a basic sticker job on the thing.
Unfortunately, the quality of Signs Express’ efforts left a little to be desired, and the vinyl they applied started cracking up not long afterwards. By the end of 2015 it was full-on ruined as the laminating layer had visibly shrunk and water was getting in everywhere causing bubbling and peeling.
 Signs Express - vehicle graphics which don't like the outdoors!
I can’t say I was too happy at having to pay a second time to get an old van rebranded, but seeing as the ol’ Tango-wagon already has 200k+ miles on her clock and she’ll likely be retiring to the scrapyard once I’ve finished putting her through her paces, now seemed like the right time to revisit the illuminated livery idea and have a little fun with the thing.
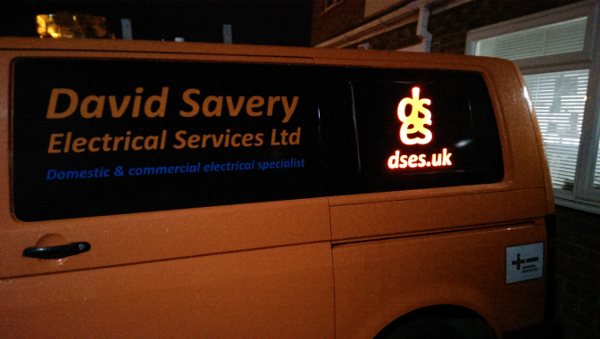
The plan is for the logo and web address to be visible as normal in the day, but from dusk they will be all aglow for that extra eye-catching wow-factor… or “hunh?!” factor, depending upon the beholder. Now, we’re not talking super bright; I don’t want to be accused of causing a distraction to other road users, but it will be noticeable in the hours of darkness.
 Now that's what I'm talking 'bout!
Is it legal? Ha! I knew you’d ask! Well, as far as I know there is nothing in the Highway Code to prevent it, but there are other considerations which I look forward to arguing the toss over with a pedantic traffic officer in a windswept layby sometime soon…
- Orange running lights on the side of vehicles are permitted. Trucks and vans have them, even my trusty-and-much-missed Volvo V40 used to have them. This is also an orange light on the sides of a vehicle, it just happens to be larger than most and shaped in the format of my logo and web address!
- Blue lights are specifically not permitted on non-emergency vehicles by the Highway Code, however how many boy-racers have you seen with blue lamps screwed into the front side-lights of their knobby hot-hatches? I guess the few remaining police officers out there have bigger fish to fry than pulling over idiots like them... or me.
- Buses have orange matrix signs on their sides, often showing an animated display to indicate their number and destination. If orange illuminated signs are good for one commercial vehicle, they’re good for another. Precedent set m’lud, I rest my case!
- I can always turn them off.
Now, if you’re a one-man-band looking at vehicle branding, then my advice is not to bother with any of the livery firms in Warwickshire, especially if you’re after something out of the ordinary. None of them answer emails, a couple didn’t even answer the sodding door when I turned up during business hours, and certainly none of them wanted to contribute to my ideas of how I could achieve my illuminated aims.
In the end I figured out for myself just how I wanted it done, and one Warwick firm finally (seemingly reluctantly) gave me a quote after I pestered them with the specifics…
…however, by the time they came back to me I had already ventured further abroad to try my luck in Coventry and was fortunate enough to meet Lee at Coventry Signs who was the first person to show some enthusiasm for the project. Although more expensive than the Warwick quote, Lee and co. won my business, and deservedly so.

How it’s applied
The basic graphics applied by Coventry Signs are your ordinary vinyl as seen on any other tradesperson’s wagon, however an A2 cut-out has been left at the rear on each side.

Besides the graphics applied directly to the van, I’ve also had two A2 acryllic panels made up. These have orange film applied to the rear, and blackout film on front, so once the logo and lettering have been cut out from the blackout film, the light may pass through the orange from behind revealing my logo and website lettering in their full garish glowing glory.

Speaking of the light, I’m using IP67 LED strips for this task. You can buy these in 5 metre reels which can be cut to size, have adhesive backings and come in all sorts of colours. I bought an orange reel originally, but the cool white version is much brighter, and the orange film on the panels will colour the light as I want it.
Originally I’d planned to adhere the LED strips to the side of the van so that they would shine out directly from behind the cut-outs in the panels, but because the panels will be mounted as close as possible to the sides of the van there wouldn’t be enough clearance to diffuse the light and prevent ‘spotting’ whereby the individual LED elements can be seen through the acrylic.
In the end I ran the strips in lines around the sides of the logo and lettering on the rear of the acrylic panels themselves. Once fitted to the van, the light has nowhere to go except forward through the orange cut-outs, although It does make the lighting a little uneven as it is edge-lit around the lettering. Still, it does work, and pretty damn well too.

The LED strips run off a 12V source so they’re ideal for operating from a vehicle battery. The string sections are cut to size and connected in series in a ‘ring’ configuration so should one individual wire fail on either the positive or negative rail then they’ll continue to operate. That said, I hold out no long term hope for these things, simply because although they’re IP67 rated, the extremes of temperature over the seasons, the chance of moisture getting where it shouldn’t and the daily vibrations from rumbling along over those county potholes the Local Authority can’t be arsed to repair will inevitably take their toll. The strips will perish and eventually require replacement, but it’ll be interesting to see how long it’ll take for that to happen. It might only be six months, then again they might outlast the remaining life of the van. To mitigate against them packing up and prevent a failure of the project (as eventually happened with my aquarium lighting), I have used good trustworthy LED strips from a reputable supplier rather than some no-brand tat or some crap from off the likes of eBay. Of course, I've also fused it at source to prevent the battery bursting into flames should they perish enough to short circuit!
When it comes to affixing the acrylic panels onto the sides of the van, I’ve used stacks of Stixall clear sealant to both hold them fast and to provide a barrier to the water from getting in. Black sealant has then been used for the edging beading, although I didn’t do a great job of that. Well, what the hell, do I look like a flimmin’ plumber??


In fact, I later engaged the services of Phil-the-Plumber to re-do the side beading and he made a better job of it. A shame I didn’t get him to do it in the first place as the remnants of my efforts remain visible in places and rather let the side down a little.

How it works
In its simplest form, I could just connect the LED strings to the battery via a switch and knock ‘em on and off as required, but where the hell is the fun in that?? Wouldn’t it be better if it could turn itself on and off automatically at night when the van is parked on my driveway, advertising this website to all and sundry as they pootle past? And for that matter, wouldn’t it be good if it could utilise as little power as possible from the van’s battery?
Hell yeah! So let’s start with the latter and see how we can reduce our power consumption to prevent the battery from taking a kick in the cells when having to power this thing for any length of time. Oh, and a warning for those not into electronic explanationals (not a real word), you might want to skip to the Automatic Controller section further below or risk getting an ice-cream headache!
Electronic explanationals….
When directly connected to a 12V DC source, the LED strings are fully powered and pull a total of about 1 Amp. I’m going to reduce that consumption by rapidly flashing the LED strings so they are not constantly powered, however the flash rate will be high enough that to the human eye they’ll appear to be static.
To do this, I’ve knocked up this circuit which electronics boffins will immediately recognise as a 555 timer IC configured as a basic astable multivibrator.

When the switch is closed, resistors R1 and R2 together with capacitor C1 cause the 555 chip to output a square wave on pin 3. This feeds a power indicator LED via R3 in the cab of the van simply to show it's on, but the output is also fed into the base of a BFY51 NPN transistor via R4. The transistor is there because the 555 chip can only source or sink 200mA and our LED strings pull more than that, so the transistor which is rated at 1 Amp takes the load and prevents frying of the chip.
The output on pin 3 of the 555, and therefore also the transistor, is a square wave something like that depicted below.

The transistor is being used as a switch, so when the 555 output voltage is high (source minus 1.7v - Mark Time (Tm)), it is fed into the transistor's base and the transistor becomes saturated creating an electrical pathway across its collector/emitter junction to ground. The LED strings are connected in a common anode configuration so when the CE junction is 'on' there will be a potential difference across the LED strings and they can light. When the 555 output falls low (Space Time (Ts)), the transistor CE junction becomes open circuit removing the path to ground and therefore removing the potential difference across the LED strings to extinguish them.
As already mentioned, the values of R1, R2 and C1 determine the length of Tm and Ts, so we can calculate these timings by using a bit of maths – and who ever thought maths would come in useful?
As R1 = 5.6k Ohm, R2 = 5.6k Ohm and C1 = 1uF……
Tm = 0.693 x (R1 + R2) x C1
Tm = 0.693 x (5.6x103 + 5.6x103) x 1x10-6
Tm = 7.762mS
Ts = 0.693 x R2 x C1
Ts = 0.693 x 5.6x103 x 1x10-6
Ts = 3.88mS
Period (T) = 7.762mS + 3.88mS = 11.642mS
Frequency = 1/T = 85.8Hz
What all this really adds up to is that the LED strings are illuminated for just under 8 milliseconds (Tm), then turned off for nearly 4 milliseconds (Ts) before the cycle repeats. This means the LED strings never reach their full brightness as they would if they were powered directly from a constant DC source, however the slight loss of light output doesn’t affect the operation of the signs, yet the current consumption is now reduced by two thirds to a total of about 330mA.
Incidentally, I also played about with a light sensor to vary the brightness of the LED strings depending on how bright the outside ambient light was. This was achieved by fitting a Light Dependant Resistor (LDR) in place of R2 along with a 1N4148 (or similar) diode connected in parallel with the LDR with the diode’s anode connected to pin 7 of the 555 and its cathode on pin 6. For R1 a 1k resistor was used, and C1 was changed to a 0.1uF capacitor. The diode effectively shorts out the LDR during the capacitor charging cycle, reducing the duration of Tm, then blocks the current on the discharge cycle forcing it to go through the LDR whose resistance increases the darker the ambient light gets. This varies the duration of Ts causing it to be of a longer duration when the ambient light is lower (because the resistance of the LDR is higher), which keeps the transistor CE junction open circuit for longer and therefore switches off the LED strings for longer in darker conditions making them appear less bright. This works rather well as an automatic LED dimmer – it effectively dims the LEDs as the ambient light gets darker and brightens them in lighter conditions to make them easier to see, which may seem contrary to how you think it should work, but in fact this is just the same as how your mobile phone screen operates whereby the screen brightens in lighter conditions so you can see it clearly, and it darkens at lower light levels so that you’re not dazzled.
In the end I didn’t bother with the LDR for two reasons. Firstly, where would I mount it? On the outside of the van it would be affected by the headlights of other vehicles or by streetlights and I’d have to waterproof it. If mounted in the cab, then it may still be affected by such sources and also by the courtesy light. Secondly, I don’t need the LED strings to vary in brightness, I just want them on when they’re on and off when they’re not. You won’t see them in daylight and you will see them at night, so why mess around? Still it’s interesting though…, no?
It’s worth bearing all this in mind as instead of an LDR one could install a potentiometer for use as a twiddlable manual dimmer control but, either way, if you want to dim LED strings, then flashing them using pulse width modulation and varying the frequency as described here is the only practical way to achieve an even dimming effect. Simply reducing the voltage wouldn’t work as variations in the manufacture of individual LED elements would mean some glow brighter than others for a particular given input voltage giving an uneven variation across the length of the string… which would look shite.
Y’know, I might put this technique to use somewhere in the future if a client wants a bespoke LED string installation that needs dimming control. In the meantime, and getting back on topic, here's the circuit constructed on some stripboard:


AFF3
The Automatic Controller.
Hey, did you chicken out of reading that last section and skip straight to this bit? Well, rest assured this is less technical territory, but does explain how I installed some automated control to the thing.
What I want is for the signs to switch on and off automatically at night, say between 18:00 and 22:00 to advertise this website when the sky goes dark. The trouble is, until dusk you wouldn’t know these things were even switched on as they have a gentle light output. Of course, ambient light varies according to the weather and the season, so I face a headache of finding or building some kind of light sensor with a timer function that can run from a 12V source…. unless…

…on my pile of old electrical cack is this battery operated central heating controller with a voltage-free relay output. No need to hook it into the van’s battery, it runs from two AAA cells and gives me a programmable timer that will click the relay on and off as per the user-set programme. The programme also incorporates the ambient temperature as it has a built-in thermometer.
This works almost as well as a light sensor as I can tell it to turn on between 18:00 and 22:00 if the temperature in the cab drops to, say, below 13 degrees Celcius. If it’s higher than that, then the chances are it’s a spring/summer evening and probably too light for the signs to show they’re on, so there’s no point in them being on, at least not until later when the temperature falls as evening moves into night-time. In the autumn/winter, or on a cold and therefore likely dark evening, the ambient temperature would probably be such that the controller would be triggered by the lower temperature and the signs would illuminate earlier.
It’s not foolproof, but it is a quick, cheap and ready solution, plus as with any other central heating timer, I can manually override it to force the signs on or off should I choose to do so.
 The timer and control board mounted to the bulkhead at the rear of the cab. The control PCB has been
fitted into one of those silly ChocBox things with wiring between the two devices on the rear of the bulkhead.
So we have… hey… HEY – c’mon, are you still with me?? Slurp some coffee friend, we’re nearly at the end now… don’t make me come over there and slap you hard across the face….
…as I was saying, so we have an illuminated sign which (hopefully) doesn’t give rise to any Highway Code violations, and certainly can’t when the van is parked on a private driveway.

Personally, I think it’s only a matter of time until this sort of thing is commonplace, especially with advances in LCD/LED technology. Did you ever see that film, Children of Men? It’s a top book, but the film is also good and features vehicles in the near future with animated advertisements on their side in its opening sequence. The kind of waterproof film technology that would be required to make that a reality is just around the corner, like it or not. It’s like the animated advertising hoardings that have been seen around the edge of football grounds since the Millennium, once an eye-opener, quickly commonplace.
I reckon that soon you'll see trader’s vans with such animated vinyl signwriting. Signwriting firms will cut the stuff to fit, but instead of producing physical graphics they’ll knock up the animation, size it to the panel layout and programme the controller. That might start happening sooner rather than later, in which case my LED panels will suddenly look very low-tech, but until then I’m the man in the van with the plan!
Hey, don’t forget to look out for my next project where I attach propellers and ray-guns to the van and become the world’s first bad-ass flying sparkie!
ker-POW!
2021 update:
I thought I'd pen a quick update on how this project went as this article was written some time ago. Sadly, my illuminated signs were only in place for less than a year after which I changed my dying VW for a newer Transit. While tempted to repeat the illuminated livery on the new van, I had also undergone a rebranding from the orange dses 'pumpkin' logo used in this project to white on orange "dses.uk" lettering and I felt the new colouring was less conducive for illumination on a moving vehicle. That said, I notice newer buses have switched from orange to white LED matrix displays, so perhaps the precedent has again been set!
Other than that, the project was largely a success. Water got into one sign requiring me to remove it, replace damaged LED strips and stick it back on, but aside from that it all looked and worked very well for the short time the panels were in use. I am tempted to get new ones made up for the Transit, but this time I would attempt to seal the LED strips on the rear so that water getting behind them would be less of a problem. We'll see what happens I guess. As for the old panels, they sat around for a couple of years before I refurbished them with orange strips and mounted them on the walls inside the office.
As 2022 approaches and brings forth the ten-year anniversary of my starting this company, I have rebranded once again and gone back to orange on black, this time with a new font. I know, I know, third rebrand in a decade! But going back to orange on black has rekindled my interest in illuminated vehicle signage, so watch this space perhaps....


AFF1